


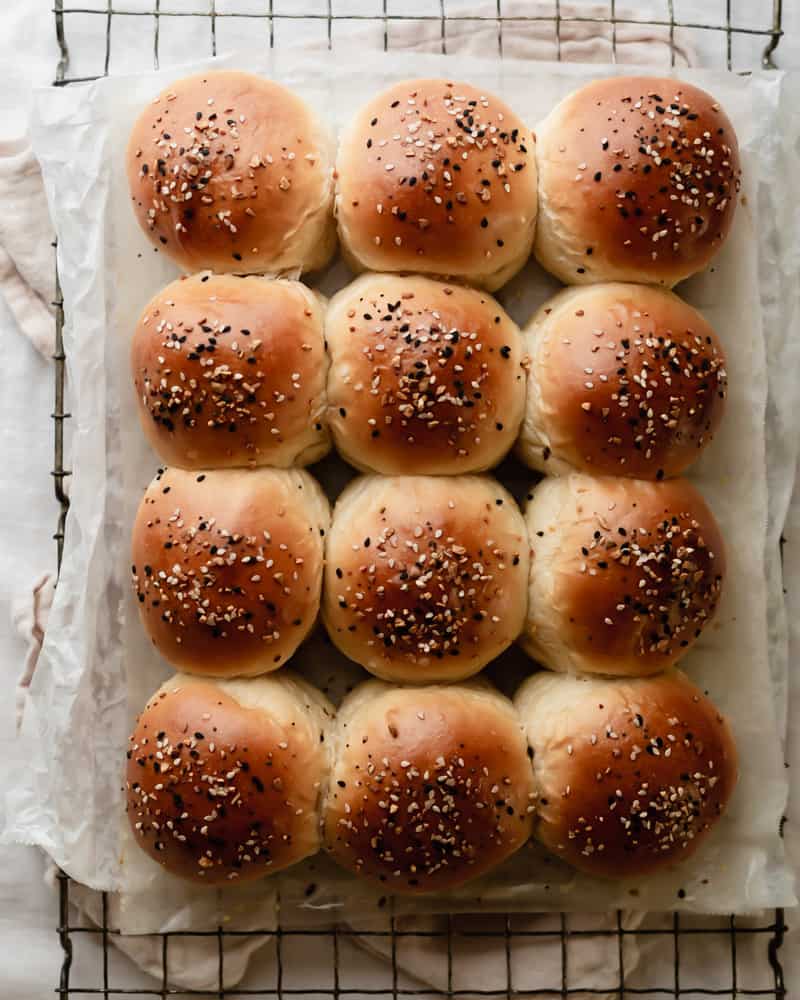
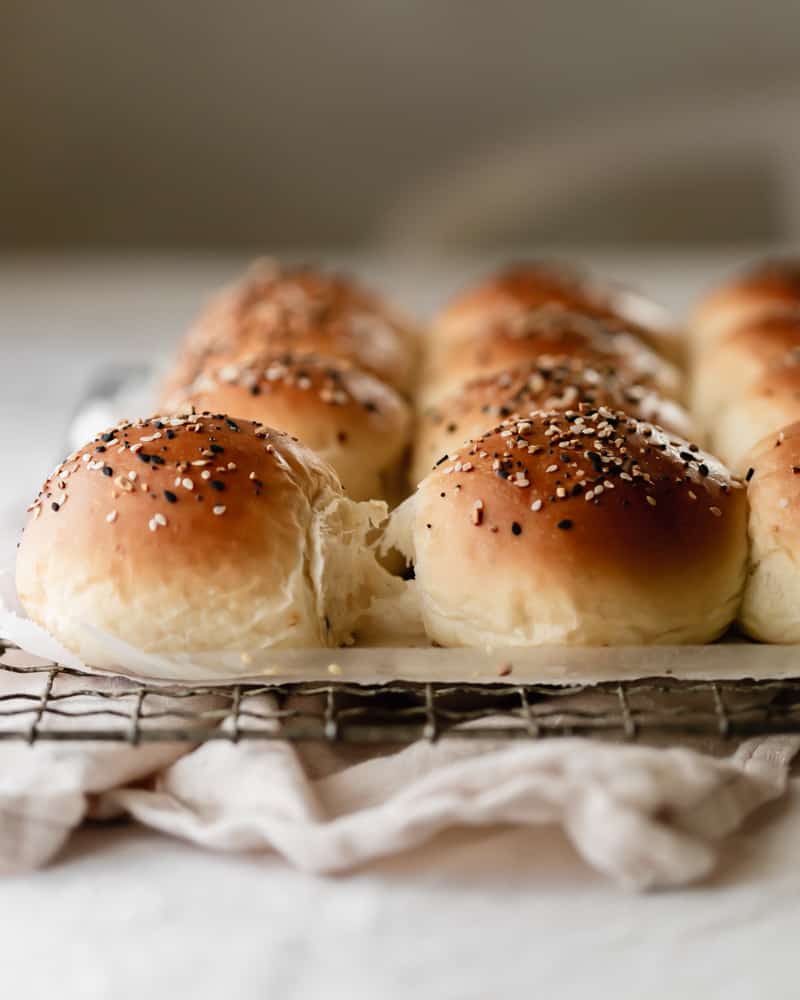
Say hello to the fluffiest dinner rolls. In my opinion, these Japanese milk bread dinner rolls are everything you want in a dinner roll: slightly sweet, golden brown tops, buttery, soft, and pillowy. In fact, they’re so fluffy that when you push down on them, they’ll bounce right back. My favorite part is pulling them apart when they’re still slightly warm. The seams of the buns pull apart like cotton candy. So, what’s the secret to these little pillows of heaven? Japanese Hokkaido milk bread uses what is called the “tangzhong method” which makes the crumb texture extra soft and tender.
If I haven’t already convinced you, then I think it goes without saying that Japanese milk bread dinner rolls are a must for every holiday dinner table. If you want to impress your guests for Thanksgiving or Christmas, then you’ll definitely want to include these on your holiday menu. Trust me. They’ll be the star of the show and they make a mean leftover turkey and cranberry or honey baked ham sandwich.
But, I must also mention that they’re not just limited to the holiday season and are great any time of the year. If you know me, then you know milk bread is my absolute favorite and is on repeat in my house on the regular. These dinner rolls make the perfect vehicle for sliders, sandwiches, soup dunkers, or breakfast sammies (my fav!).
What is the tangzhong method?
As I mentioned in my Black Sesame Japanese Milk Bread recipe, the tangzhong method originates from Japan and was popularized by Chinese cookbook author, Yvonne Chen. It is the process of cooking a portion of the flour and water to make a roux and typically has a 5:1 ratio of water (or sometimes milk) to bread flour. But, what does it do? Simply put, utilizing the tangzhong methods results in an ultra fluffy crumb and soft texture.
Scientifically speaking, however, the tangzhong gelatinizes the starches which enables the dough to hold more moisture and ultimately produces the milk bread’s signature tender, soft crumb. It also prevents the bread from getting stale or hard unlike other breads that will dry out when left on the counter for a few days. Milk bread will stay soft for several days when tightly wrapped.
Good luck and happy baking!


Japanese Milk Bread Dinner Rolls
Ingredients
For the tangzhong (flour roux):
- 3 tablespoons (25 grams) bread flour
- ½ cup (125 grams) water
For the Japanese milk bread dough:
- ½ cup (125 grams) whole milk , warmed to 95°F
- 2 ¼ teaspoons (7 grams) instant yeast
- 2 ¾ cups (350 grams) bread flour , spooned and leveled*
- 3 tablespoons (39 grams) granulated sugar
- 1 ¼ teaspoon (7 grams) Kosher salt
- 1 large egg , room temperature
- 3 tablespoons (42 grams) unsalted butter , cubed and softened at room temperature
- 1 large egg , for egg wash
Instructions
Make the tangzhong (water roux)
- In a small saucepan, whisk together the bread flour and water until well combined and there are no clumps. Cook over medium-low, for about 3 minutes while whisking constantly, until the roux starts to thicken and reaches 150°F/65°C. The roux should have the consistency of a curd.
- Remove from heat and let cool to room temperature. To speed up the process, I like to loosely cover and refrigerate for about 10-15 minutes.
Make the milk bread dough
- In a small saucepan, heat the milk on low until it reaches 95°F/35°C.
- In the bowl of a stand mixer fitted with the hook attachment, add the warm milk (95°F/35°C), egg, and cooled tangzhong paste. Then add the bread flour, sugar, instant yeast, and kosher salt. Do not add the softened butter yet.
- Mix on low until all the ingredients are incorporated, about 1 minute, and then increase speed to medium and mix for 8-10 minutes until the gluten develops and the dough starts to feel elastic.
- Scrape down the sides of the bowl with a rubber spatula, turn the mixer on medium-low, and gradually add the softened butter, one tablespoon at a time until the butter is fully incorporated. This may take awhile, so be patient. Once the butter is incorporated, turn the mixer back on medium speed and mix for another 5-10 minutes until the dough starts to pull away slightly from the bowl. (*NOTE: It won’t completely clear the sides of the bowl and will still be a bit tacky to the touch since it is a wetter dough, but it should feel elastic and tight like a rubber band. So resist the urge to add more flour.)
- Using wet hands, shape the dough into a ball and transfer to a greased bowl or container. Cover and let rise until doubled in size, about 45-60 minutes, depending on how hot or cold your house is. Be sure to keep an eye on it because it can go fast if it’s really hot outside! Likewise, it can take longer if it’s really cold inside your house.
Shape and final proof
- In the meantime, grease a quarter sheet pan or 9”x13” pan and line the bottom with parchment paper. Set aside.
- Once proofed, gently deflate the dough, transfer it to a lightly floured surface, and flatten it with your fingers, being careful not to puncture the dough, to release the gas. Divide the dough into 12 equal pieces, about 63 grams each. If you don’t have a scale to make even proportions, then I like to flatten the dough out into a square to make it easier to evenly divide. Then cut the dough into fourths and then thirds for 12 pieces.
- Next, shape the rolls into a tight, round ball. To do so, flatten the dough with the heel of your hand on a floured surface to release any excess gas (the dough will be sticky so use floured hands if needed) and then take the ends of the dough and tuck them into the center to form a ball. Then place the ball seam side down, shape your hands into the shape of a “C”, then cup the dough from the side and with slight pressure, roll the ball around in a circle formation until you feel some tension in the dough. Make sure to seal the bottom and then transfer to the prepared quarter sheet tray or 9”x13” pan, spacing the rolls evenly. (*NOTE: You can watch how I roll the dough into balls on my pumpkin doughnuts IG story highlights @studiobaked)
- Cover and let rise for another 30-40 minutes, depending on how hot or cold your house is. The rolls should look very puffy but they won’t be fully touching (they’ll expand when baking). To check, if you gently press down with your index finger, the rolls should slowly spring back. If it does not spring back and it leaves an indent, then the rolls are over-proofed.
- Meanwhile, preheat the oven to 350°F while the rolls proof.
Bake the Japanese milk bread
- In a small bowl, mix one egg with 1 tablespoon of water. Beat well.
- Brush the top of the rolls with the egg wash. Top with everything but the bagel seasoning, flaky sea salt, poppyseeds, sesame seeds, or whatever topping you desire.
- Bake for 20-25 minutes until golden brown and an instant-read thermometer reads 200°F when inserted into the center.
- Remove from the oven and brush the tops with melted butter. After a few minutes, turn them out of the pan onto a cooling rack. The dinner rolls are best served warm. But, if you bake them ahead of time, then cover with foil and reheat in the oven for a few minutes before serving.